Managing Tasks with Jenkins CI
 Jenkins could be implemented in practically any company that has to automatically deploy applications and infrastructures, as well as for just comfortably managing various types of tasks.
There are lots of different tools on the market today, both proprietary and free, that make continuous integration as easy as possible.
Jenkins is a free tool that offers countless capabilities thanks to the availability of thousands of plugins, which are constantly being upgraded and released.
The most basic approach to managing tasks is the actual Jenkins web interface, where we can configure whatever we need. Unfortunately, the more tasks we have and the more varied they are, the harder it is to maintain.
Today we’ll be looking at how we can make creating tasks in Jenkins easier and faster.
Our Tools
Jenkins Job Builder
This is a python script that lets us describe tasks in YAML and JSON format and then uploads them to the server via HTTP API. We just have to install it on our local machine, write the configuration file with connections, and describe the tasks.
Current project documentation
DSL Plugin
This is a Jenkins plugin, which we can use to describe tasks in a special language (DSL, Domain Specific Language) and then generate them from those descriptions. It runs locally on the actual Jenkins server.
Plugin page
Jenkins Pipeline
This is a type of Jenkins task that we can use to describe deployment or application build processes in stages. We’ll be describing our pipeline in a special Jenkinsfile, which will be saved in the project’s repository.
Gitlab and Gitlab CI
This is the most popular and actively developing self hosted project, which is also used by many companies. There are separate community and enterprise versions.
Gitlab has its own CI written in Go, which lets us execute various build and deploy stages from Runners.
To get started, we have to create a .gitlab-ci.yml file in the project’s repository. This is where we’ll describe our execution sequence. Docker would work excellently in this case.
Let’s Get Started
To start off, we’ll install the necessary tools.
In our case, Jenkins Job Builder has be be installed on both the local machine and the machine that will run the gitlab agent (although this can be the local machine as well).
To install the latest available version on Linux and Mac:
pip install jenkins-job-builder
brew install jenkins-job-builder
We’ll be able to test it locally to describe our seed job.
I should add that “seed job” in DSL Plugin terminology is a free-style jenkins job that creates other jobs from DSL scripts.
The installation process for the gitlab server is the same as for the local Linux machine:
pip install jenkins-job-builder
To be safe, we launch the tool just to make sure it works:
➜  ~ jenkins-jobs
usage: jenkins-jobs [-h] [--conf CONF] [-l LOG_LEVEL] [--ignore-cache]
                    [--flush-cache] [--version] [--allow-empty-variables]
                    [--user USER] [--password PASSWORD]
                    {update,test,delete,delete-all} ...
Installing Plugins
Now we’ll install our Jenkins plugins. We can use the classic UpdateCenter from the Manage Jenkins → Manage Plugins → Available section, or curl/wget by downloading the plugin from the official plugin page:
- gitlab — 9.4.4-ce.0
- gitlab-ci-multi-runner — 9.4.2
Creating a Repository
We’ll create a repository for our code with the task description.
We’ll start by preparing our seed job (seed-job). The repository will contain the following files:
jenkins.ini
[job_builder]
ignore_cache=True
keep_descriptions=False
include_path=.
recursive=False
allow_duplicates=False

[jenkins]
user=username
password=secret-pass
url=http://example-ci.org
job-generator.yml
---
- job:
    name: job-generator
    description: 'Do not edit this job through the web!'
    scm:
    - git:
        url: git@gitlab-selfhosted.org:group/repo-dsl.git
        branches:
            - origin/master
        credentials-id: some-credentials-id
        timeout: 20
        basedir: dsl
    triggers:
    - gitlab:
        trigger-push: true
        trigger-merge-request: false
        trigger-open-merge-request-push: both
        ci-skip: false
        set-build-description: false
        add-note-merge-request: false
        add-vote-merge-request: false
        add-ci-message: true
        allow-all-branches: true
        branch-filter-type: RegexBasedFilter
        target-branch-regex: '.*master*.'
    builders:
    - dsl:
        target: "dsl/*.groovy"
        ignore-existing: "false"
        removed-job-action: "DISABLE"
        removed-view-action: "DELETE"
        lookup-strategy: "SEED_JOB"
.gitlab-ci.yml
job:
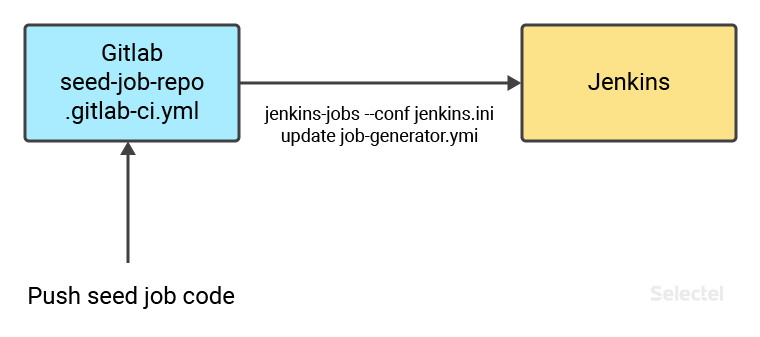
  script: 'jenkins-jobs --conf jenkins.ini update job-generator.yml'
Now we’ll connect gitlab-runner to our project. Since the gitlab interface has seen a lot of frequent changes recently, we recommend referencing the official documentation.
After connecting, it should look something like this:

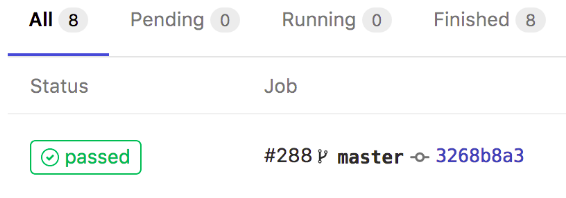
Now we commit the changes, and in the Jobs section of our project, we’ll see the following:

The process is represented in the flowchart below:

Now we’ll prepare the repository with our task description. We’ll give it the name repo-dsl and a flat structure. No files have to be moved.
We add a file with our pipline:
pipelineJob('testpipeline-build') {
    description('Build test docker image, test and push it to local registry')
    definition {
        cpsScm {
        scm {
            git {
            branch('origin/master')
            remote {
                url('git@gitlab-selfhosted.org:test-group/sample-project.git')
                credentials('gitlab-creds')
            }
            }
        }
        scriptPath('Jenkinsfile')
        }
    }
}
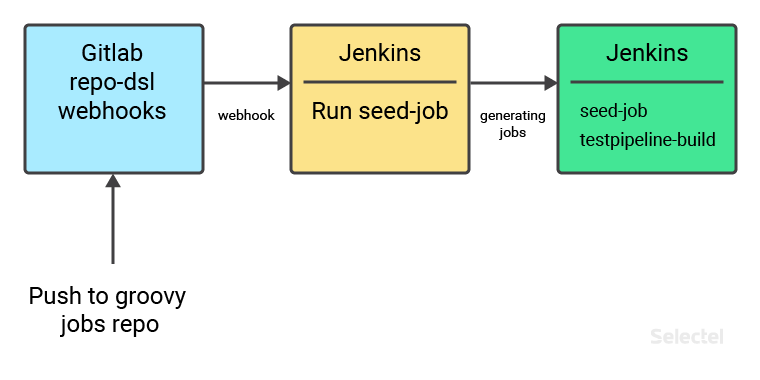
We’ll configure a webhook to launch the seed-job we created earlier.
In this version of gitlab, webhooks are located in the Settings → Integrations section of the project.
We create a webhook to push (gitlab:pass@ci.org/projects/job-generator). The process looks like this:

We now have two tasks in our Jenkins:
- The seed-job task generator
- The testpipeline-build pipeline task
In the test pipeline, we’ll build a Docker image, which will be loaded to the local Docker registry afterwards. The image file will be taken from another project.
In the sample-project project, we create a Jenkinsfile containing the following:
node {
    def app

    stage('Clone repository') {

        checkout([$class: 'GitSCM', branches: [[name: '*/master']],
        doGenerateSubmoduleConfigurations: false, extensions: [],
        submoduleCfg: [], userRemoteConfigs:
        [[credentialsId: 'gitlab-repo-creds',
        url: 'git@gitlab-selfhosted.org:test-group/docker-image-file.git']]])
    }
    stage('Build image') {
        app = docker.build("docker-image")
    }

    stage('Test image') {
        sh '''
        if ! docker inspect docker-image &> /dev/null; then
            echo 'docker-image does not exist!'
            exit 1
        fi
        '''
    }

    stage('Push image') {

        echo 'Push image'
        docker.withRegistry('https://local-registry:9666', 'registry-creds') {
            app.push("${env.BUILD_NUMBER}")
            app.push("latest")
        }
    }

    stage('Clean existing image') {
    sh "docker rmi docker-image"
    }
}
When all is said and done, the pipeline will look as follows in the Jenkins blueocean interface:

Or in the classic interface:

To automatically launch this task, we can add a webhook to the project with our Docker image, where the task will be launched after changes are sent to the repository.
In conclusion, we’d like to note that this article describes just one of the many possible approaches to managing tasks in Jenkins. Thanks to its flexibility and functionality, you can use whatever approach makes managing tasks as easy and comfortable as possible for you (based on your infrastructure and requirements).