Containerization Mechanisms: Namespaces
Linux container solutions have gained quite a bit of popularity over the last few years. A lot of people have written or spoken about how containers can be used and what for, but little attention has been paid to the mechanisms behind containerization.
All containerization tools, like Docker, LXC, or systemd-nspawn, are built on two Linux kernel subsystems: namespaces and cgroups. In this article, we’ll be taking an in-depth look at namespaces.
Let’s start by moving a step back. The idea behind namespaces is nothing new. In 1979, the chroot() system call was added to UNIX. The goal was to give developers a testing platform that was independent of the root system. Let’s first go over how this works, and then we’ll look at namespace in today’s Linux systems.
Chroot(): A First Attempt at Isolation
Chroot is an abbreviation for change root. By using the chroot() system call and command, we can change the apparent root directory for a process and its children. Programs launched from the changed root directory will not be able to access files outside of this catalog.
The UNIX file system is structured hierarchically:
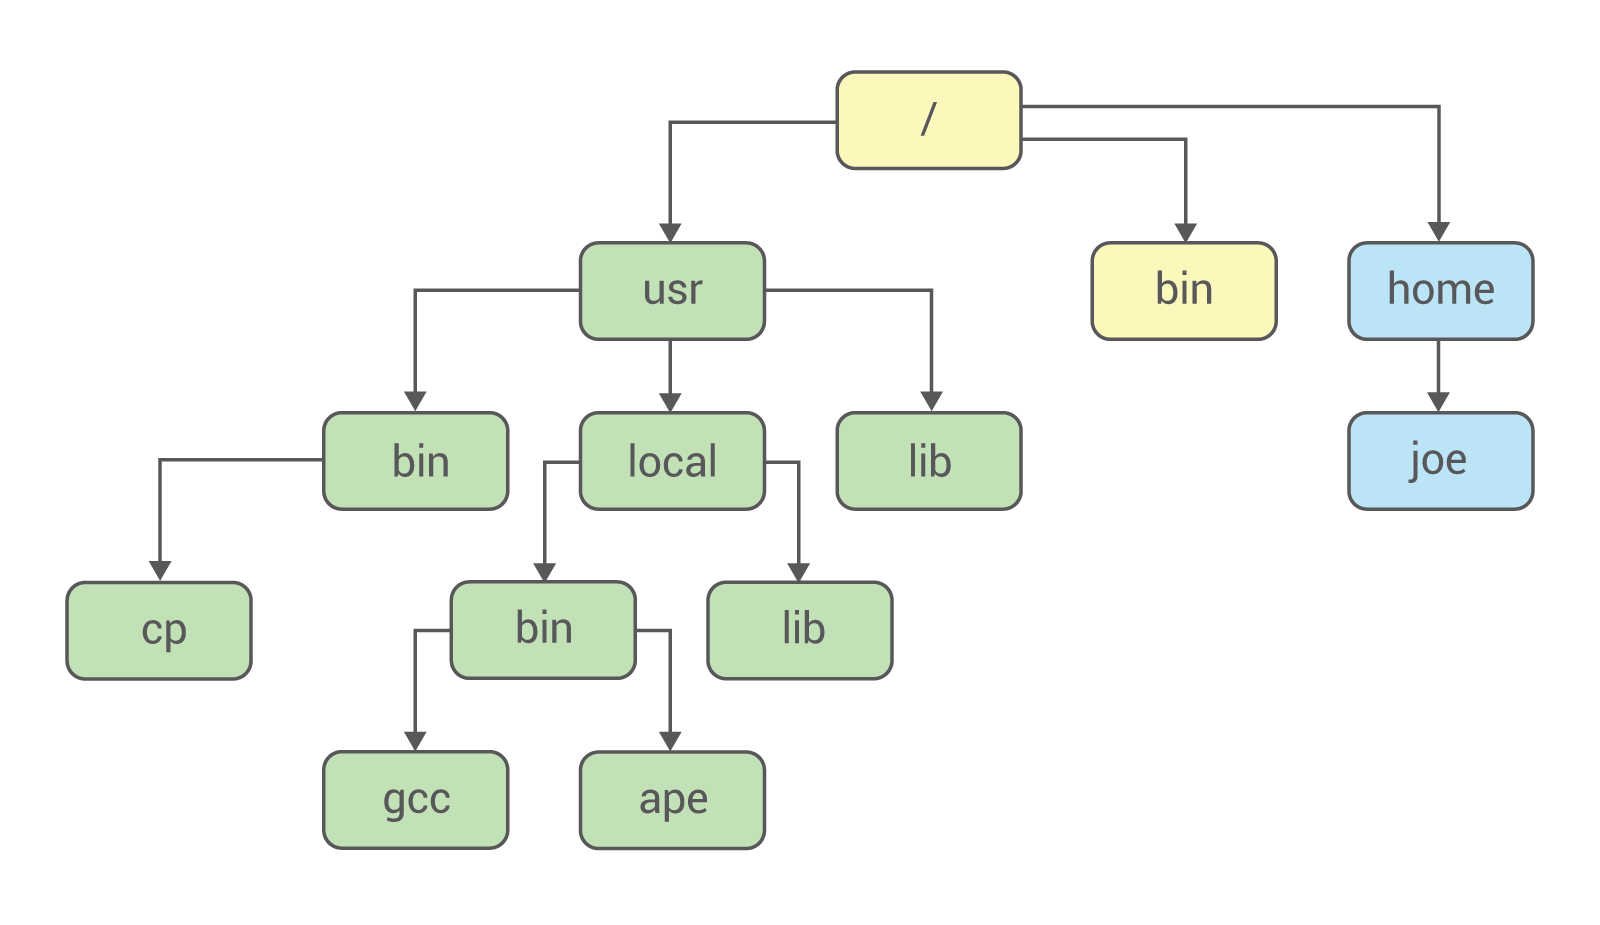
The top of this tree is /, or the root. All other catalogs (usr, local, bin, etc.) appear under this directory.
Chroot creates a second root directory, which as far as the user can tell, is no different from the first. We can visualize a file system with a new root directory as follows:
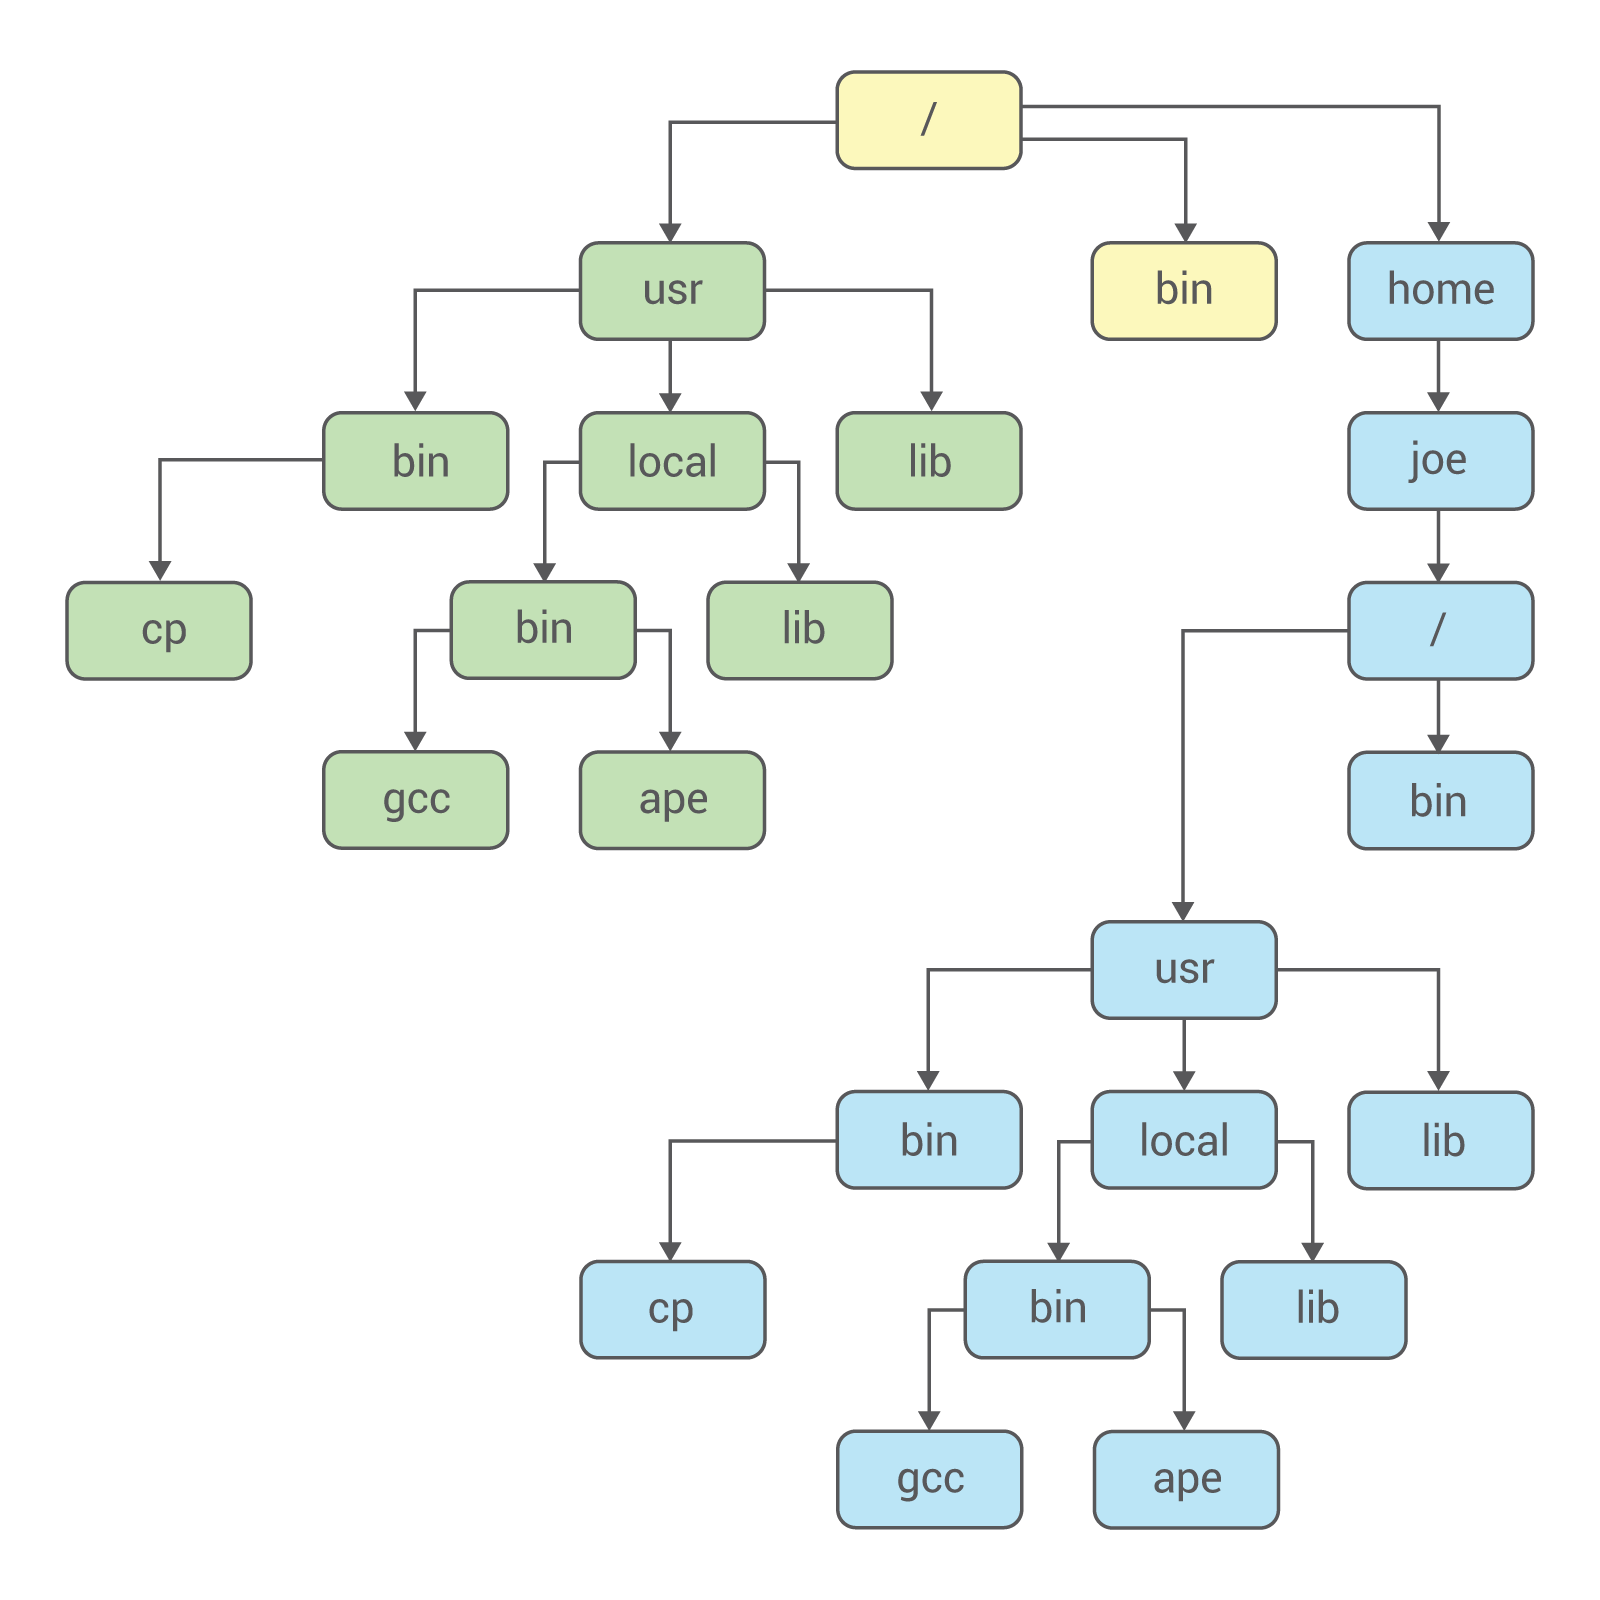
The file system splits into two parts, and they in no way affect one another. So how does chroot work? Let’s check out the source code. In this article, we’ll be looking at chroot in BSD-Lite 4.4.
The chroot system call is described in the file vfs_syscall.c:
сhroot(p, uap, retval)
    struct proc *p;
    struct chroot_args *uap;
    int *retval;
{
    register struct filedesc *fdp = p->p_fd;
    int error;
    struct nameidata nd;

    if (error = suser(p->p_ucred, &p->p_acflag))
        return (error);
    NDINIT(&nd, LOOKUP, FOLLOW | LOCKLEAF, UIO_USERSPACE, uap->path, p);
    if (error = change_dir(&nd, p))
        return (error);
    if (fdp->fd_rdir != NULL)
        vrele(fdp->fd_rdir);
    fdp->fd_rdir = nd.ni_vp;
    return (0);
}
The second to last line of our fragment is the most important: that’s when the current directory becomes the root.
Chroot is a bit more complicated in the Linux kernel (the following fragment was taken from here):
SYSCALL_DEFINE1(chroot, const char __user *, filename)
{
    struct path path;
    int error;
    unsigned int lookup_flags = LOOKUP_FOLLOW | LOOKUP_DIRECTORY;
retry:
    error = user_path_at(AT_FDCWD, filename, lookup_flags, &path);
    if (error)
        goto out;

    error = inode_permission(path.dentry->d_inode, MAY_EXEC | MAY_CHDIR);
    if (error)
        goto dput_and_out;

    error = -EPERM;
    if (!ns_capable(current_user_ns(), CAP_SYS_CHROOT))
        goto dput_and_out;
    error = security_path_chroot(&path);
    if (error)
        goto dput_and_out;

    set_fs_root(current->fs, &path);
    error = 0;
dput_and_out:
    path_put(&path);
    if (retry_estale(error, lookup_flags)) {
        lookup_flags |= LOOKUP_REVAL;
        goto retry;
    }
out:
    return error;
}
Let’s look at chroot in a few practical case uses.
We run the following commands:
$ mkdir test
$ chroot test /bin/bash
The second command returns an error message:
chroot: failed to run command ‘/bin/bash’: No such file or directory
The error occurred because the shell wasn’t found. Remember: chroot creates an embedded file system that cannot access the parent. Let’s try again:
$ mkdir test/bin
$ cp /bin/bash test/bin
$ chroot test
chroot: failed to run command ‘/bin/bash’: No such file or directory
Another error. Even though the message is the same, the error is completely different from last one. The shell returned the latter message because the necessary executable file couldn’t be found. In the former, the error was returned by the dynamic linker: it couldn’t locate the necessary libraries. These will also need be copied to chroot. We can find out exactly which dynamic libraries we need by running the following:
$  ldd /bin/bash
	linux-vdso.so.1 =>  (0x00007fffd08fa000)
	libtinfo.so.5 => /lib/x86_64-linux-gnu/libtinfo.so.5 (0x00007f30289b2000)
	libdl.so.2 => /lib/x86_64-linux-gnu/libdl.so.2 (0x00007f30287ae000)
	libc.so.6 => /lib/x86_64-linux-gnu/libc.so.6 (0x00007f30283e8000)
	/lib64/ld-linux-x86-64.so.2 (0x00007f3028be6000)
Afterwards, we execute the following commands:
$ mkdir test/lib test/lib64
$ cp /lib/x86_64-linux-gnu/libtinfo.so.5 test/lib/
$ cp /lib/x86_64-linux-gnu/libdl.so.2 test/lib/
$ cp /lib64/ld-linux-x86-64.so.2 test/lib64/
$ cp /lib/x86_64-linux-gnu/libc.so.6 test/lib
$ chroot test
bash-4.3#
Success! Let’s try to run the ls command in the new file system:
bash-4.3# ls
We get the following error:
bash: ls: command not found
We know why: the ls command does not exist in the new file system. We need to copy the executable file and dynamic libraries again using the same method as before. This is the major drawback of chroot: all required files have to be duplicated. Chroot also leaves a lot to be desired in terms of security.
There has been more than one attempt to improve chroot and provide more reliable isolation: these have resulted in well-known technologies like FreeBSD Jail and Solaris Zones.
In Linux, process isolation was improved by introducing new subsystems and system calls. We’ll explore some of them below.
The Namespace Mechanism
Namespace is a Linux kernel mechanism that isolates processes from one another. Work started in kernel 2.4.19.
At the moment, Linux supports six kinds of namespaces:
| namespace | Isolates |
|---|---|
| PID | PID processes |
| NETWORK | Network devices, stacks, ports, etc. |
| USER | User and group IDs |
| MOUNT | Mount points |
| IPC | SystemV IPC, POSIX messages |
| UTS | Host and NIS domain name |
Modern containerization systems (e.g. Docker, LXC, etc.) use all of these namespaces when programs are launched.
PID: PID Process Isolation
The Linux kernel used to only support one process tree. Process trees are hierarchical structures that are similar to the file system directory hierarchy. The introduction of namespace mechanisms meant multiple fully independent process trees could be supported.
In Linux, the first process launched is given process identification number (PID) 1. In the process tree, this is the root. This launches other processes and services. The namespaces mechanism lets you create separate branches with their own PID 1. The process that creates this fork is a part of the primary (parent) tree, but its child process is now the root of a new process.
Processes in the new tree never interact with the parent process or even see it. At the same time, parent tree processes can access all child tree processes. This is shown in the image below:
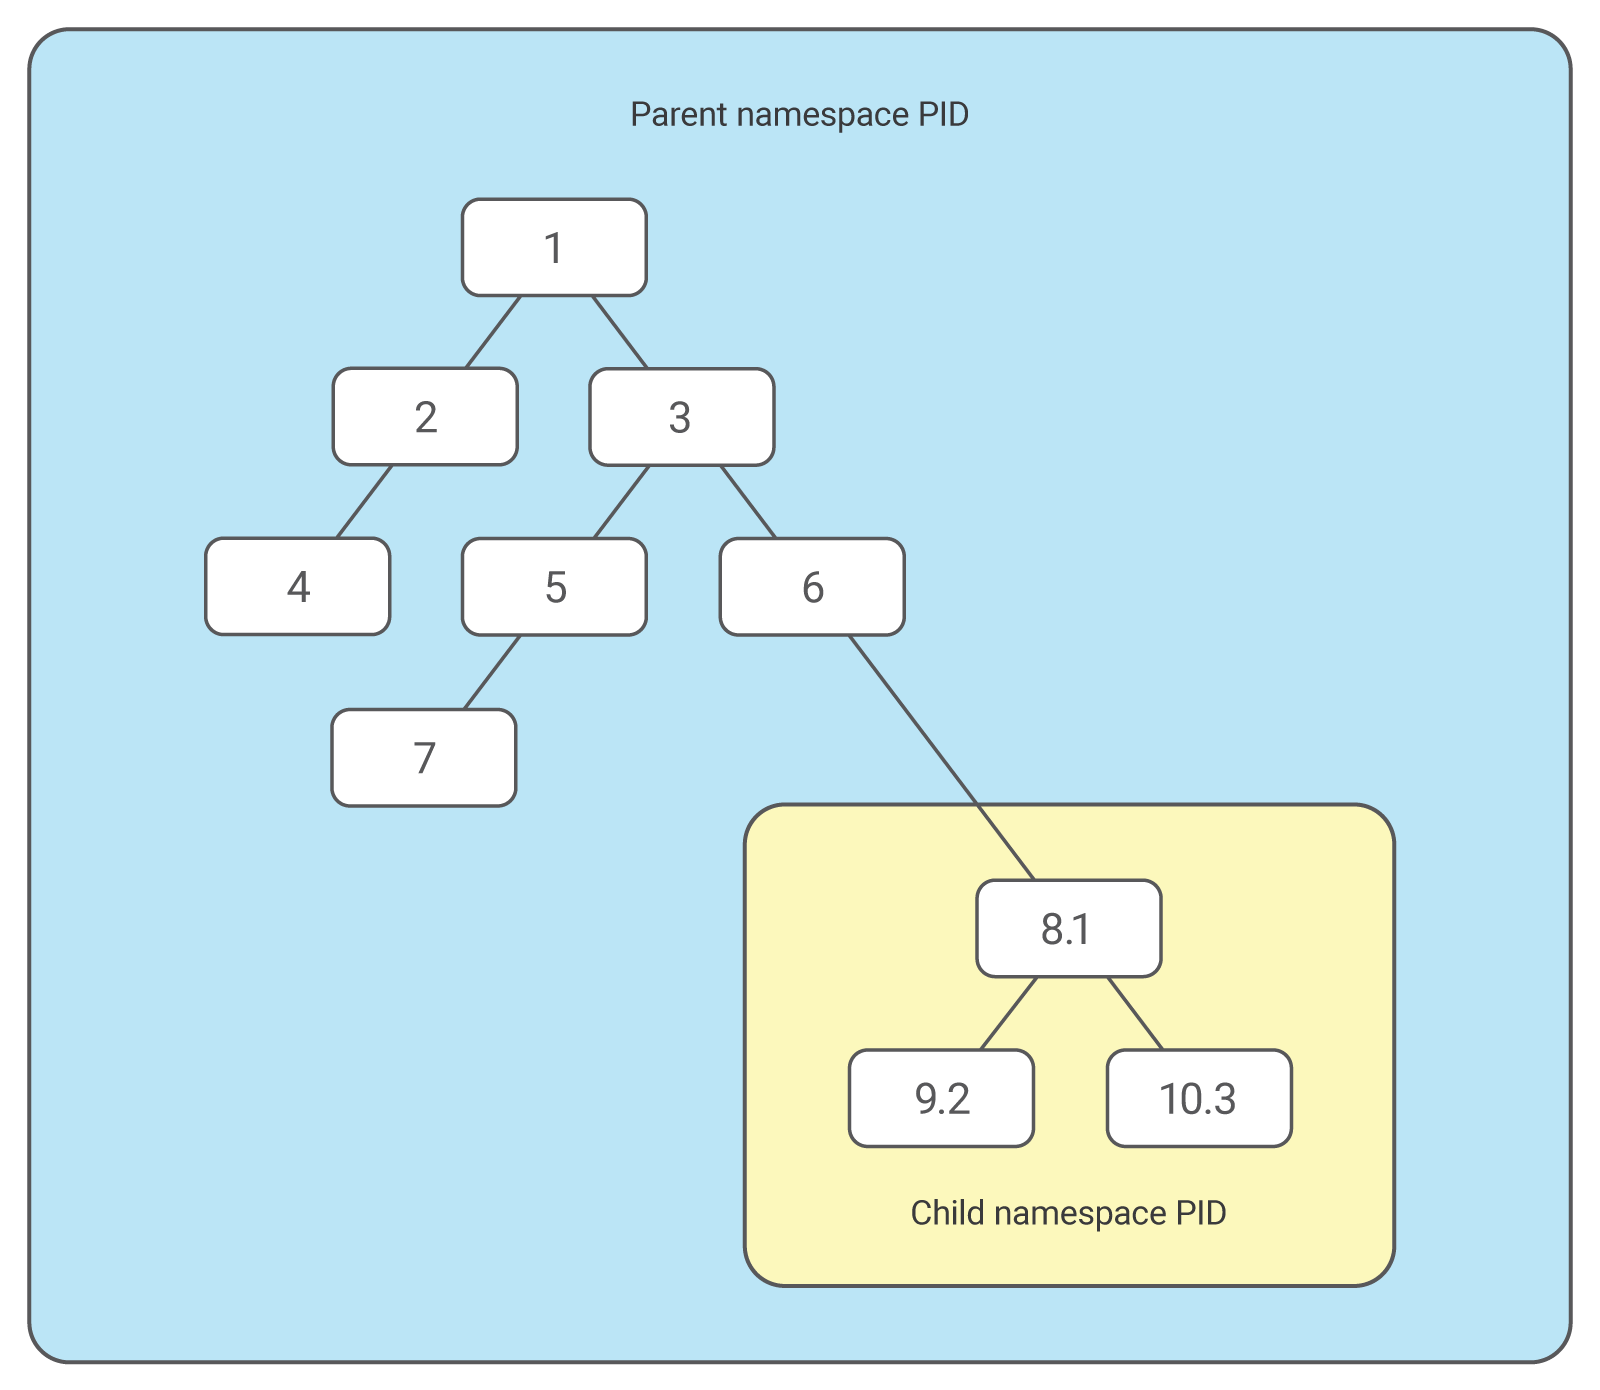
We can create several embedded namespace PIDs: one process launches a child process in the new PID namespace, and that spawns a new process in newspace, etc.
One process can have multiple PIDs.
To create new namespace PIDs, we use the clone() system call with the CLONE_NEWPID flag. With this flag, new processes can be launched in new namespaces and in new trees. This can been seen in a small program written in C (from here on in, the base examples come from here but have been heavily modified):
#define _GNU_SOURCE
#include
#include
#include
#include
#include

static char child_stack[1048576];

static int child_fn() {
  printf("PID: %ld\n", (long)getpid());
  return 0;
}

int main() {
  pid_t child_pid = clone(child_fn, child_stack+1048576, CLONE_NEWPID | SIGCHLD, NULL);
  printf("clone() = %ld\n", (long)child_pid);

  waitpid(child_pid, NULL, 0);
  return 0;
}
We compile and launch the program. Once it has run, we get the following call:
clone() = 9910
PID: 1
A lot of interesting things took place while that program was being run. The clone() function created a new process by cloning the current process and then started to execute it. Here, the new process branched off from the main tree and a separate process tree was created for it.
Now, let’s modify the code and get the parent PID from within the isolated process:
static int child_fn() {
  printf("Parent PID: %ld\n", (long)getppid());
  return 0;
}
Our modified program should return the following:
clone() = 9985
Parent PID: 0
The line “Parent PID: 0” means that the process doesn’t have a parent. We’ll make one more change to the program and remove the CLONE_NEWPID flag from the clone() call:
pid_t child_pid = clone(child_fn, child_stack+1048576, SIGCHLD, NULL);
In this case, the clone system call functioned almost the same as fork() and simply created a new process. There’s a big difference between fork() and clone() though which we should explain in detail.
Fork() creates child process copies of parent processes. The parent processes are copied with their execution context: allocated RAM, open files, etc.
Unlike fork() calls, clone() doesn’t only create a copy, it lets you share contextual elements between parent and child processes. In the example above, the clone function used the child_stack argument, which specifies where in the stack the child process is. As soon as child and parent processes can share memory, the child process cannot be executed in the same stack as the parent process. Thus, the parent process should set the RAM of the child tree and send that parameter in the clone() call. The clone() function can also use flags to specify what needs to be shared between parent and child processes. In our example, we used the CLONE_NEWPID flag, which indicates the child process should be created in a new PID namespace. We’ll look at examples of other flags below.
We’ve looked at isolation at the process level, but this is only the first step. Processes launched in separate namespaces have access to all system resources. If these processes were to listen on port 80, this port would not be available for other processes. Different namespaces can help avoid these situations.
NET: Network Isolation
With the NET namespace, we can designate network interfaces to isolated processes. Even the loop-back interface will be unique for each namespace.
We can create network namespaces using the clone() system call with the CLONE_NEWNET flag. We can also do this using iproute2:
$ ip netns add netns1
We’ll use strace to see what went on in the system while the command was being executed:
.....
socket(PF_NETLINK, SOCK_RAW|SOCK_CLOEXEC, 0) = 3
setsockopt(3, SOL_SOCKET, SO_SNDBUF, [32768], 4) = 0
setsockopt(3, SOL_SOCKET, SO_RCVBUF, [1048576], 4) = 0
bind(3, {sa_family=AF_NETLINK, pid=0, groups=00000000}, 12) = 0
getsockname(3, {sa_family=AF_NETLINK, pid=1270, groups=00000000}, [12]) = 0
mkdir("/var/run/netns", 0755)           = 0
mount("", "/var/run/netns", "none", MS_REC|MS_SHARED, NULL) = -1 EINVAL (Invalid argument)
mount("/var/run/netns", "/var/run/netns", 0x4394fd, MS_BIND, NULL) = 0
mount("", "/var/run/netns", "none", MS_REC|MS_SHARED, NULL) = 0
open("/var/run/netns/netns1", O_RDONLY|O_CREAT|O_EXCL, 0) = 4
close(4)                                = 0
unshare(CLONE_NEWNET)                   = 0
mount("/proc/self/ns/net", "/var/run/netns/netns1", 0x4394fd, MS_BIND, NULL) = 0
exit_group(0)                           = ?
+++ exited with 0 +++
Pay special attention: here, the unshare() system call is used to create a new namespace and not the clone call. Unshare() lets a process or thread disassociate a part of the execution context being shared with other processes (or threads).
How are processes moved to a new network namespace?
Firstly, the process that created the new namespace can make new processes, and each of these will inherit the parent network namespace.
Secondly, the kernel has a special system call, setns(), which can be used to reassociate calling processes and threads with namespaces. To do this, we need the file descriptor that refers to the namespace. This is saved in the file /proc//ns/net. After we open this file, we can copy the file descriptor to the setns() function.
There is another option. When creating the new namespace with the ip command, a file is created in the /var/run/nets/ directory (check the tracing output above). We could just open this file to get the file descriptor.
Network namespaces can’t be deleted with system calls. They are kept alive as long as they are in use.
MOUNT: File System Isolation
We’ve already mentioned isolation on the file system level while looking at the chroot() system call. We mentioned that chroot() doesn’t provide reliable isolation. Using MOUNT namespaces, we can create fully independent file systems that can be associated with different processes.
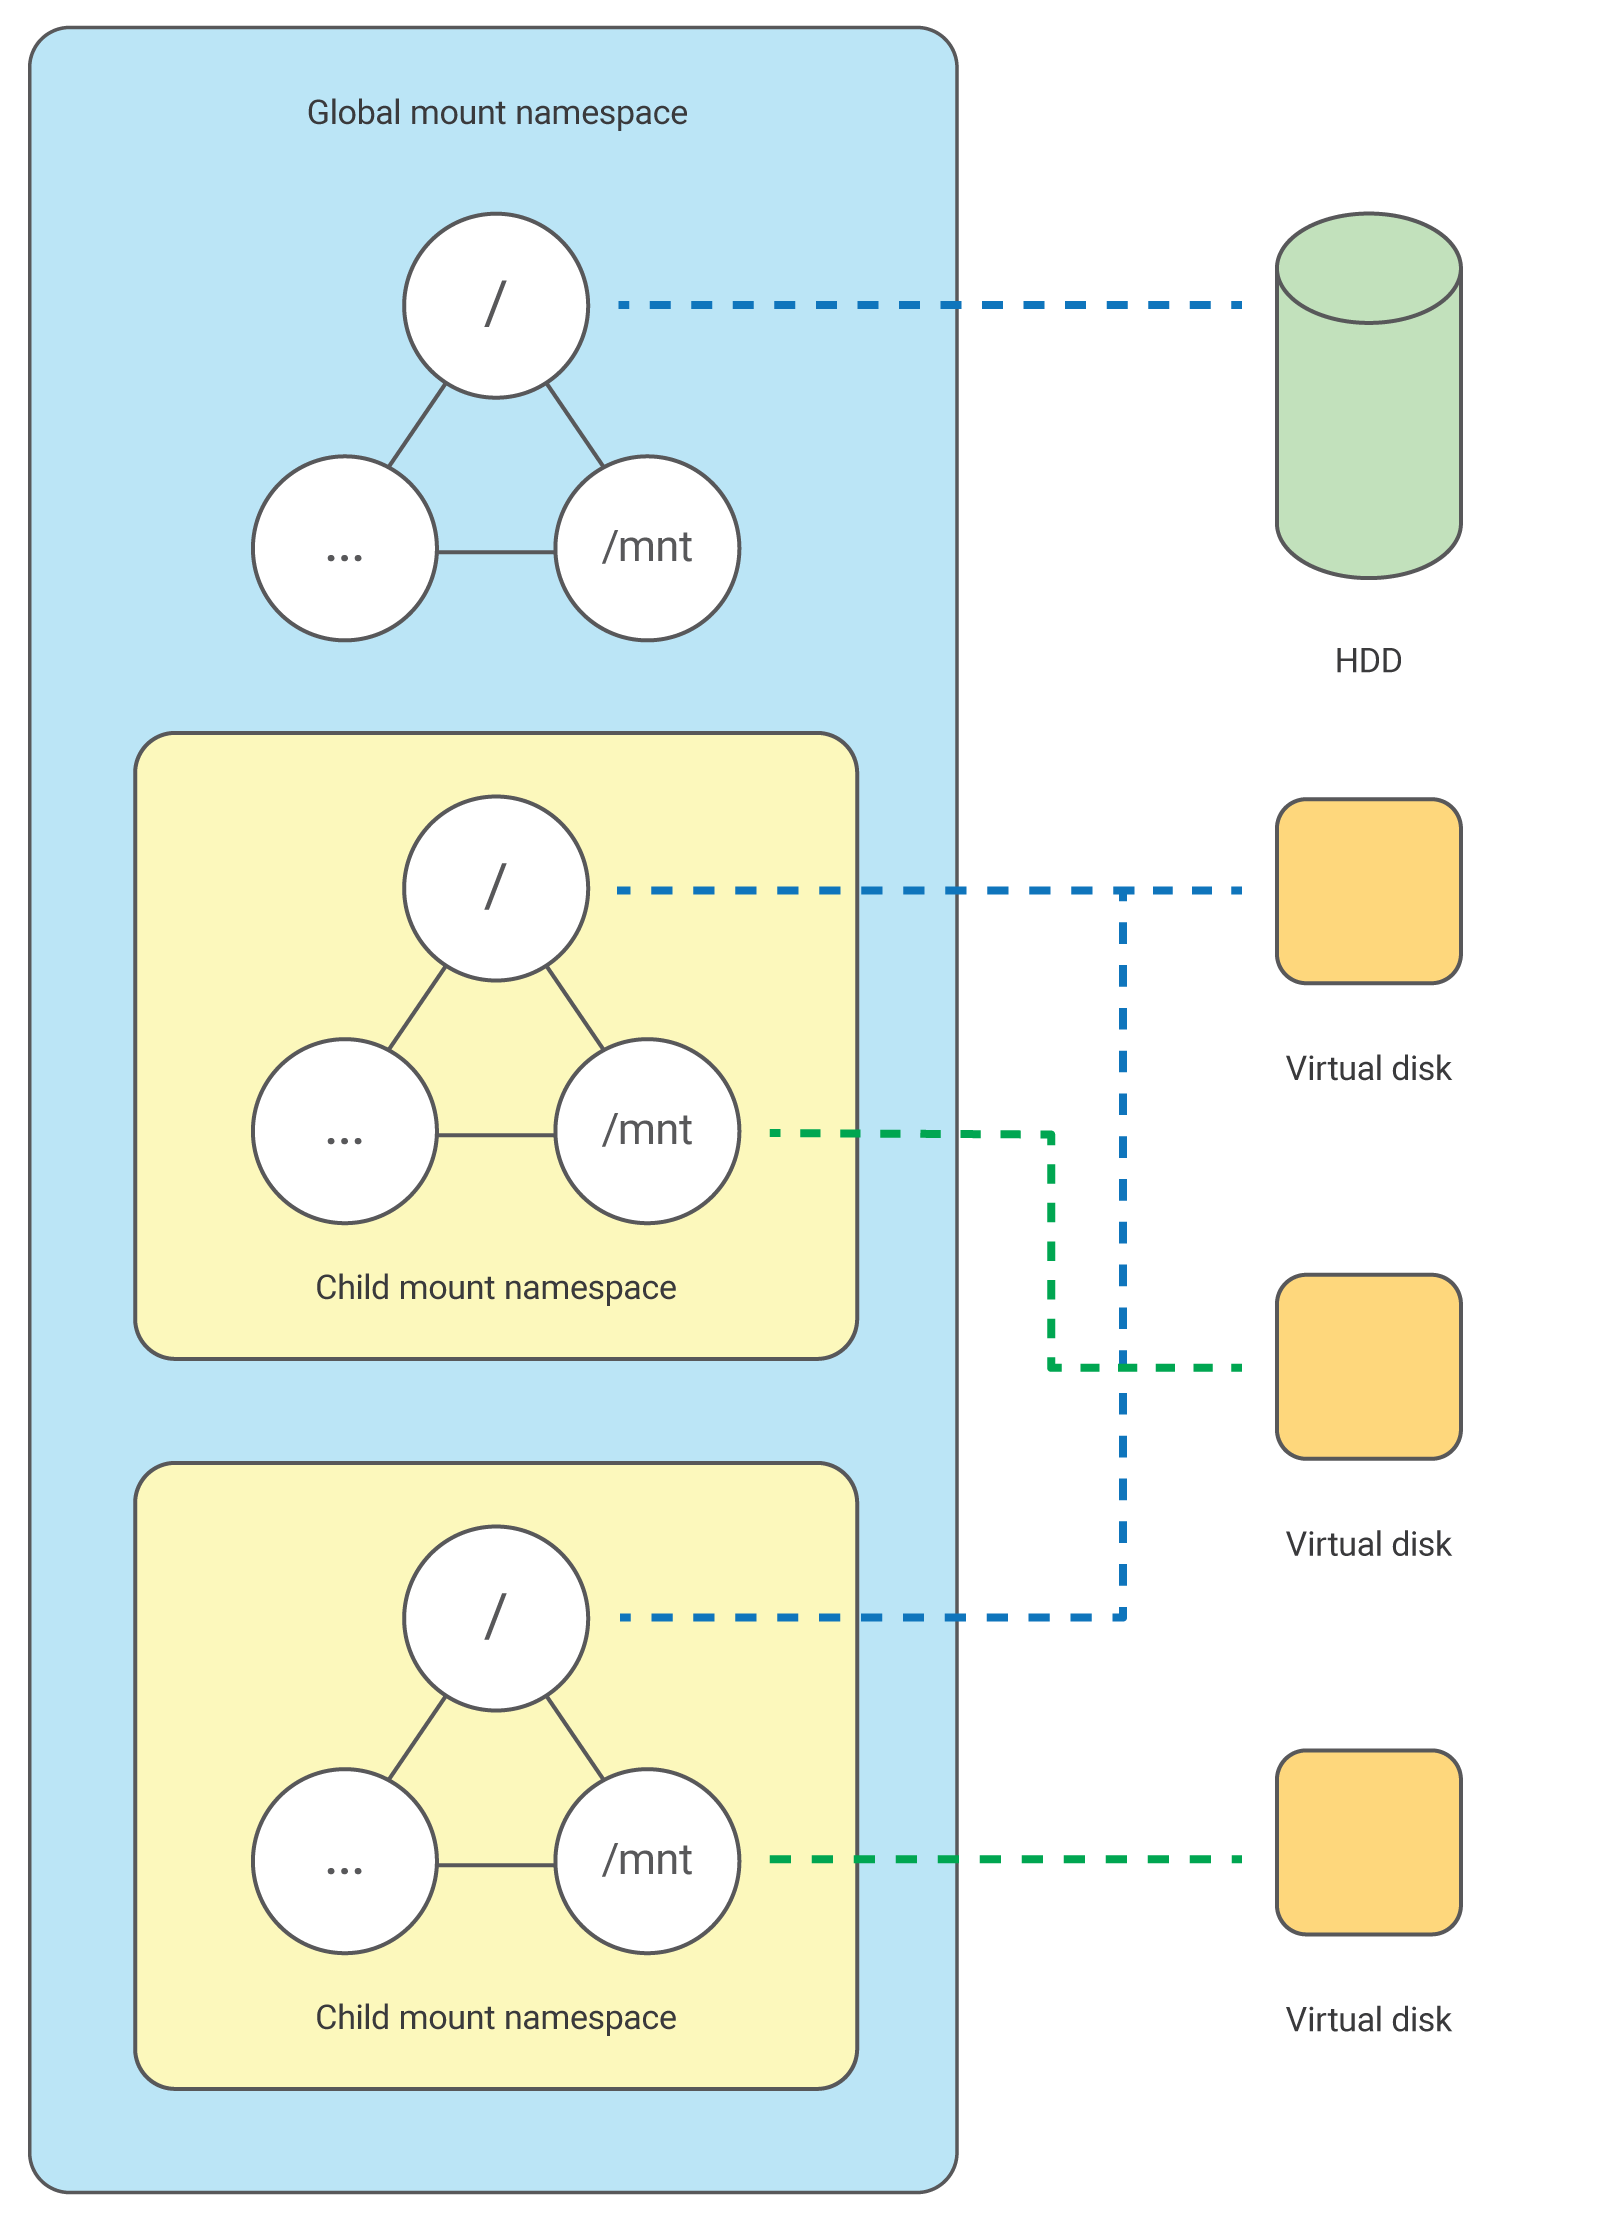
To isolate the file system, we use the clone() system call with the CONE_NEWNS flag:
clone(child_fn, child_stack+1048576, CLONE_NEWPID | CLONE_NEWNET | CLONE_NEWNS | SIGCHLD, NULL)
The child process first “sees” the same mount points as the parent. As soon as the child process is moved to a separate namespace, any file system can be mounted to it and no parent process or other namespace will be able to access it.
Other Namespaces
Isolated processes can also be placed in other namespaces: UID, IPC, and PTS. UID grants root privileges to a process in a specific namespace. With the IPC namespace, resources can be isolated for cross-process communication.
UTS is used for isolating system identifiers: node names and domain names returned by the uname() system call. Let’s look at another small program:
#define _GNU_SOURCE
#include
#include
#include
#include
#include
#include


static char child_stack[1048576];

static void print_nodename() {
  struct utsname utsname;
  uname(&utsname);
  printf("%s\n", utsname.nodename);
}

static int child_fn() {
  printf("New name: ");
  print_nodename();

  printf("Name will be changed in new namespace!\n");
  sethostname("NewOS", 6);

  printf("New node name: ");
  print_nodename();
  return 0;
}

int main() {
  printf("Original node name: ");
  print_nodename();

  pid_t child_pid = clone(child_fn, child_stack+1048576, CLONE_NEWUTS | SIGCHLD, NULL);

  sleep(1);

  printf("Original node name: ");
  print_nodename();

  waitpid(child_pid, NULL, 0);

  return 0;
}
The programs output will look like this:
Original node name: lilah
New node name: lilah
Name will be changed in new namespace!
New UTS namespace nodename: NewOS
As we see, the child_fn() function displays the node name, changes it, and then displays the new name. This change only occurs within the new namespace.
Conclusion
In this article, we took a general look at how the namespace mechanism works. We hope this has helped you better understand the principles behind containers.
As per tradition, below are some additional resources for anyone interested:
- Series of articles about namespace mechanisms at LWN.net
- Namespaces programmer’s manual
- Lecture notes on namespaces and cgroups
We will certainly continue our look at containerization mechanisms in the future. In our next article, we’ll be discussing the cgroups mechanism.